Without or with a sewing machine, learn how to hem pants perfectly. No matter your level of sewing experience, this tutorial will produce excellent results whether you are making a new pair of pants from scratch or modifying a pair you already own. I even provide a no-sew option for you!
A frustrating situation is when you buy new pants and can’t shorten them. If hemming pants seems intimidating, take a moment to pause and read these straightforward instructions.
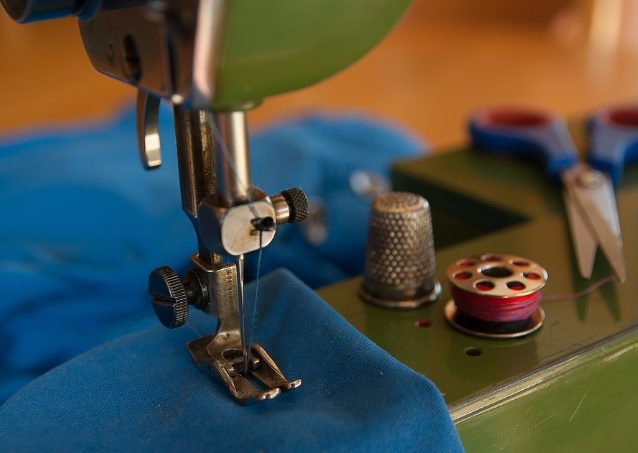
Quick Steps to Hem Pants with a Sewing Machine:
- The ideal length for the pair of pants should be pinned.
- Measure the New Hemline
- Cut off the Excess Fabric
- Press the New Hem
- Sew the Hem
Tools You’ll Need
- Tailor’s chalk or a chalk pen
- Ruler
- Scissors
- Iron
- Straight pins
- Sewing machine (take a look at The Good Housekeeping Institute Textiles Lab’s best sewing machines)
- Fabric thread
How to Hem Pants
1. Pin the Pair of Pants to the Perfect Length.
Naturally, the wearer of the item should be wearing it while having it hemmed (along with a pair of shoes) in order to achieve the desired length. They should ideally stand before a full-length mirror.
Never believe someone who simply states, “Hem them 2 inches,” or “My inseam is 30 inches.”‘ Always have them try on the pants so you can pin them and show them how the pant legs will look.
When the pants are turned inside out, I like to tuck the pin heads underneath so I can quickly grab them.
Ask the wearer to remove their pants. Verify that the hem length on each leg of the pants is the same. Here, small changes are acceptable. You can ask the wearer to put them on once more if you’d like to before continuing.
2. Measure the New Hemline
What length should the new hemline be? A 1″ hem is standard for dress pants or khakis. If you are hemming jeans, a 1/2″ hem is standard.
Inside-out the pants For a 1″ hem, use a tape measure or hem gauge to measure 2″ above the pinned fold line.
To sew a 1/2″ wide hem on jeans, only measure 1″ above the fold.
Mark the cutting line on the inside of the pants using a fabric marking pencil or tailor’s chalk.
3. Cut Off the Excess Fabric
Once more turning the pants right side out, trim the extra fabric from the pant legs along the marked line with good sewing shears. Read about the scissors and shears I like best for sewing.
4. Press the New Hem
Bring the pants back to being inside out and iron them there.
Turn the bottom edge up to the inside by 1″ (or 1/2″ for jeans) and press. To be accurate, a hem gauge is useful.
Next, raise the bottom edge by the same amount again. Make sure your hem is even by measuring. Carefully press the freshly sewn hem.
The bottom edge should then be turned up by the same amount again. To ensure your hem is even, measure with the sewing gauge. New hem should be gently pressed.
5. Sew the Hem
Dress pants are perfect for hand sewing the hem because you can avoid having your stitches show on the outside of your pants. It’s the best way!
In order to match the pants, thread a needle with polyester thread. Polyester thread is excellent for sewing clothing because it is sturdy and barely stretches at all. My advice for picking thread is provided below.
Locate a side seam on the inside of the pants, just above the folded edge of the hem, and stitch your thread to the side seam. Watch out not to snag the pants’ outer fabric just yet.
When the thread is secured, push your needle through the fold on the hem and take a nice big stitch (about 1/2″ or 1cm), running your needle under the pressed edge.
Next, make a very small stitch on the leg of the pants that only grabs a few threads.
Repeat, and then sew a large stitch through the hem’s folded edge before sewing a tiny stitch along the bottom of the pant leg.
Be careful not to pull your thread too tightly as this may result in puckers.
Take the large stitch on the fold, followed by the small stitch on the pant leg, and pull the needle and thread through. This will allow you to work a little faster.
Till you reach the side seam from which you began, hand stitch the entire thing. Take a few stitches in the same spot to secure the hem, being careful to avoid letting any noticeable stitches protrude from the pants’ exterior.
How Long Should Your Pants Be?
The appropriate hem allowance varies depending on the style of pants, the shoes chosen to go with them, and personal preference. Furthermore, what is “just right” will vary from person to person.
Dress pants and casual pants should never touch the floor to prevent ragged and worn-out hems. A rule of thumb is to alter the pants so the back is about 1/2″ above the floor when the person is wearing shoes.
Of course, everyone has different tastes. When a woman I assisted was wearing heels, she wanted her jeans to skim the floor. To allow the wearer to see the length, make sure you have a mirror nearby (near the floor).
Using a seam ripper, you might find it advantageous to first undo the original hem. This is my favorite seam ripper; it is quick and sharp and makes removing an existing hem simple. To prevent wrinkles from getting in the way when pinning the new hem, press out any creases before removing the original folded hem.
Whether you want to hand sew the hem or use a sewing machine to finish it, you must first complete the first four steps below. I’ll show you how to do a simple blind hem stitch in the steps below.
What Width Hem Allowance to Add When Hemming Dress Pants
Here are the best widths to use for the hem allowance:
- Double Fold Hem – The hem allowance should be increased by 1 inch (2.5 cm). To cover the raw edges and prevent fraying, a double fold hem is applied twice. The most typical hem type, this can be stitched by hand or machine.
- Blind Hem – Hem allowance is 2 inches (5 cm) in addition. When you want a wider invisible hem, a blind hem is best stitched by hand or with a special presser foot.
- Hemming Tape – The tape’s quantity should be added. The majority of tapes have a width of 2 cm. Fusible tape used for hemming is activated by heat from an iron. None of the common sewing techniques are needed.
- After marking the hem, you are prepared to trim the extra fabric. Just to be clear, you will cut on the lower marked line.
What is the Best Stitch for Hemming Pants?
The best stitch for hemming pants is a medium-length straight stitch sewn on a machine, or a slip stitch sewn by hand. Your new pant hem will be strong and presentable thanks to these stitches.
How to Hem Pants by Hand
You can hem pants by hand if you don’t own a sewing machine by using just a sewing needle and thread.
Prepare a threaded needle and coordinating cotton. Sharps, which are general-purpose sewing needles, can be used to sew most fabrics. These are offered for a reasonable price in various-sized packets.
The slip stitch, or for complete beginners, the running stitch, is the preferred method for hemming pants by hand.
How to Hem Pants With a Hand Slip Stitch
- Full slip stitch tutorial
- Press the raw edge of the hem up by ¼ inch (6mm)
- Press it up again by ¾ inch (2cm) to create a double fold
- Pin the hem in place.
- Knot the end of your threading needle. To conceal the knot, start by rising in the hem fold.
- Take a few of the fabric threads near the hem’s edge and work your way from right to left.
- Take the needle diagonally along the fold of the hem at a distance of ¼ inch (6mm)
- Repeat.
How to Hem Pants With a Hand Running Stitch
Running stitch is by far the easiest stitch for those of you who have never sewn before, though it will show a little on the outside of the pants.
- Full running stitch
- Press the raw edge of the hem up by ¼ inch (6mm)
- Press it up again by ¾ inch (2cm) to create a double fold
- Pin the hem in place.
- Make a knot at the end of your needle and thread it. So that the knot is concealed, start by rising in the hem fold.
- With an up-and-down motion, sew the hem along the top of the fold. Your stitching will be stronger the smaller the stitches are.
How to Shorten Pants Without Sewing (hemming Tape)
For softer fabrics that don’t require robust, long-lasting hems, this is a very simple option. Fabric, craft, and many supermarkets all carry hem tape, also known as hemming tape.
- Make sure you leave enough room at the bottom of your pants when you cut them to the desired length.
- Leave the edge unfinished, serge it, or do a zigzag finish. You will probably leave it raw if you want a no-sew hemming option. Anyhow, the tape will prevent some fraying.
- To hem a pair of pants, all you have to do is cut a piece of double-sided hemming tape to fit the hem, slide it in place, and then press a hot iron on top to fuse the tape.
- If your fabric won’t stand up to a hot iron, don’t press directly onto it. As an alternative, place a pressing cloth between the iron and your pants.
How to Hem Pants and Keep the Original Bottom Hem
You might want to keep the original hem if your pants have particularly lovely or interesting stitching. Given how challenging it is to match the color and heft of the original hem stitching on jeans, this technique is especially well-liked in this context.
Step 1 – Mark the Desired New Length
Put the pants on and fold the cuff up to the new length you want.
Use pins to mark the fold’s edge so you can transfer the marking to the incorrect side.
Carefully unfold the hem, then mark the pin line on the correct side of the pants using the tailor’s chalk. Remove the pins.
Step 2 – Mark the Length Guide
Mark ABOVE the pin line. (In the double fold hem method, we marked below the pin line.)
- For jeans with a ½ inch (12mm) original hem, mark 1 inch (2.5 cm) above the marked pin line.
- Mark the original hem of jeans with a ¾ inch (2 cm) width at 1.5 inches (4 cm) above the marked pin line.
The original hem should now touch the yellow line as you fold the cuff up once more.
Step 3 – Stitch the Original Hem
On your sewing machine’s free arm, sew a straight stitch just below (but not on) the original hemline. Any side seams that are particularly thick should be crossed slowly.
Step 4 – Fold and Trim Excess
Press the excess fabric up while wearing the pants backwards. For it to lie flat, press the stitched seam that is above the hem well.
You’re done if it’s just a tiny fold. Trimming and finishing the raw edge may be necessary for larger folds. A different option is to use a few hand stitches to secure the sides if the fold is substantial and you don’t cut the excess. This will prevent the fold from sagging.
Here is how the exterior of your completed original hem appears. That seam hardly stands out when worn.
How to Hem Pants – in Conclusion
It is actually quite simple to cinch the hem of pants. There is no justification for wearing pants that are the incorrect length now that you know how to hem them.