Brother sewing machine helps you complete one great masterpiece after another! If you just bought your first sewing machine and bought a pile of beautiful fabrics for all the items you plan to sew! All this is exciting, but you may have just sat down and studied how to set up and use brother sewing machine. In fact, using brother sewing machine is very simple. The sewing machine manual of brother sewing machine and the diagrams on the machine clearly show how to thread, start and start sewing. This guide introduces how beginners can use brother sewing machine correctly.
How Does Brother Sewing Machine Work?
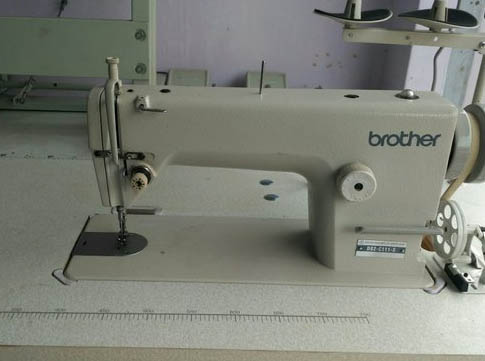
Brother sewing machine has many moving parts. Understanding the working principle of each part will help you set everything correctly. This is just a quick overview to help you understand what to look for on your new machine. If you want to explore any of these topics in depth, you should check the user manual, the manufacturer’s website, or find a detailed YouTube video to show the details in more detail.
- Power cord
This looks obvious. You may be rolling your eyes! Of course, your new brother machine needs a power supply to start. However, it is worth noting that in many cases, when operating the machine, you should shut down the machine.
- Pedal
Many of the first invented sewing machines have foot pedals to drive the machine. Nowadays, most modern sewing machines run along the direction of the pedal, which works in a similar way to the accelerator pedal of a car. Press it and the machine will run!
Your pedal will be connected to the power line that needs to be plugged into the machine, usually close to the power line.
- Thread path
The thread path is the path of the thread between the spool pin and the needle. Each sewing machine model has a slightly different thread diameter. The good news is that it is always clearly marked on Brother sewing machine, and your manual should also clearly describe it!
When the machine is running, tension is used to keep the thread and fabric at an appropriate tension. This can prevent the thread from knotting or loosening during sewing.
- Needle
You can easily find the needle on your brother sewing machine. Once the thread passes through the thread diameter from the spool, it will be inserted into the needle eye. The needle eye on the sewing machine is located at the tip, so that the thread can be passed through the fabric quickly and repeatedly without the need for the whole needle to pass through the fabric.
Some brother models are equipped with self threading devices. If you don’t have this choice, in the long run, learning how to puncture quickly will help you get out of trouble.
- Presser foot
The presser foot of brother sewing machine looks like a small, usually rectangular foot! When you sew, it pushes the fabric down to hold it in place.
- Spool
A spool is a small wheel used as an additional spool to provide thread for the underside of the suture. When the needle is pressed down, push the thread through the fabric from above. When the needle is pulled out, the bottom thread grabs it and fixes the thread under the fabric. This will produce stitches!
- Line tension
Without too much detail, the thread tension setting on Brother sewing machine allows you to determine the tightness of the suture. Different tension has better effect on all kinds of cloth.
- Stitch settings
Your brother sewing machine can sew many different designs! These sewing patterns include zigzag sewing, button hole sewing and other options, and even unique designs such as leaves and flowers! You can use the stitch setting controller to tell your machine which stitches to use.
- Reverse button
On most sewing machines, the reverse button is located on the plastic housing above the needle. It usually has a picture of an arrow that circulates around it to move backwards. This reverse or “reverse stitch” option allows you to stitch your work to prevent future wear and tear.
How to Set up Brother Sewing Machine?
First, you need to read the user manual. This is a very thick booklet, which will be put into a box with brother sewing machine. It will describe how to set up and turn on the machine, how to use it, and what it can do!
Before you turn on the power and turn on the machine, you need to wind the spool and thread the needle.
- Sewing machine manual
Please read it quickly before doing anything else. Even experienced sewer workers often refer to manuals to learn how something works.
If you buy a second-hand machine, don’t worry! You can usually find the manual online for free on the manufacturer’s website.
- What else do you need?
Before installing the sewing machine, you need to prepare a reel of thread. Having a soft cloth to wipe the dust off the machine is also helpful, and a pair of scissors is often used.
Brother sewing machine usually comes with a piece of cloth, but you may also want to find some unwanted cloth, so that you can practice using the machine without wasting good cloth.
- Means of preparation
Before you start, find out what tools and supplies you need. First of all, you need brother sewing machine itself, pedal and power cord. Don’t forget the fabric or clothes you want to sew. If necessary, scissors can be used to cut threads or fabrics.
- Connect the foot pedal
Connect the foot pedal to the cable on the back of the sewing machine. Place the foot pedal on the floor so that it can be easily reached when sewing begins.
- Spool
Unless you buy a preloaded spool, you need to wind some thread on the spool before you start sewing. Anyway, you may want to wrap your bobbin most of the time, so that the color of your line matches the color of the bobbin line perfectly!
Brother sewing machine has clear charts printed in the user manual. All you have to do is follow the numbered chart. You need to put the spool on the spool pin and fix it in place with a bracket. Then thread through the three brackets on the top of the machine according to the numbering sequence specified in the manual. This weaves the loose end of the wire onto the vertical pin in the upper right corner of the machine. Put the spool there, put the loose end through a hole in the spool and wrap it around its center for a few turns. Then move the bobbin pin to the right to lock it in place. This will set your machine to bobbin mode instead of sewing mode!
The only other thing you have to do is to step on the pedal for one minute and watch the machine wrap the thread around the tube and fill it up!
- Install spool
Some brother sewing machines have a bobbin loaded from the front or side. Some have a small box, and the tube is also inserted. You need to fill the spool correctly according to the pictures provided in the manual. Before starting sewing, be sure to leave a few inches of thread. Use the manual needle controller (usually located on the back of the machine) to raise and lower the needles once. This will make the bobbin thread move upward with the needle thread, so that there are two loose thread ends near the presser foot.
- Thread a needle
Before threading, the spool must be inserted into the spool pin on the top of brother sewing machine. Place the spool valve support like a cover on the end of the spool valve pin. This prevents the spool from flying away during sewing! Then you can loosen the line of about 10 inches and thread it through the wire diameter according to the chart in the manual or the number printed on the machine. In most brother models, you will wrap the wire around the tension knob through the first guide wire, and then wrap it around the second guide wire.
You may remember that the thread diameter is the route of a thread from the spool to the needle. You can think of this road as a windy track, with special stops at each numbered point in the figure. These are hooks and levers that generate tension during sewing.
Once you carefully thread the thread through the correct path, the loose end should hang near the needle. At this point, you can thread the needle yourself (from front to back), or you can use the automatic threading mechanism included with many brother models. This is the most difficult part of preparing for sewing. Once you master the threading brother sewing machine, everything seems easy!
- Adjust brother sewing machine settings
The remaining settings on the machine allow you to set the preferred sewing mode and adjust the tension during sewing. When you start, you may want to use straight sewing. You can practice adjusting the tension of the waste fabric to see what happens when you raise or lower the tension setting.
How to Use Brother Sewing Machine?
Once your brother sewing machine is set up, you can start sewing! Let’s have a quick list of the steps involved in using the sewing machine.
- Spool
- Thread (remember to follow the path of the line!)
- Adjust tension settings as needed
- Insert brother sewing machine and open it
- Insert the fabric under the presser foot, and then press the lever to lower the presser foot onto the fabric
- Gently press the foot pedal. This will start the motor and move the needle up and down while the machine feeds the fabric through the area under the needle
- Finally, you can use the same sewing machine to sew very simple or super advanced items. If you are just starting, you should probably start with a simple project. Sewing a round skirt, a pillowcase or a rectangular curtain board is a lot of straight sewing items, which will let you know how the machine works.
Once you feel comfortable operating your new brother machine, you can find sewing patterns that tell you how to create almost anything that can be made of cloth!
Last Word: Brother Sewing Machine
Brother sewing machine may be a little overwhelming at first, but once you get used to using them, nothing is more exciting than turning a pile of cloth and thread into something you make. However, once you take brother sewing machine home, it’s hard to know where to start. These tips will help you have more confidence in brother sewing machine and its basic functions.
Have you ever been stuck in the following problems with sewing machines? Read & Learn more together!
- Why My Sewing Machine Not Making Straight Stitches – How to Adjust
- Why My Sewing Machine Skipping Stitches – How to Fix
- How to Change Sewing Machine Needle With Simple Methods
- How To Clean Your Sewing Machine With Simple Steps
- Why Does My Sewing Machine Keep Jamming – How To Solve
- What is a Serger Sewing Machine – Everything You Should Know
- How To Hem Pants By Sewing Machine In The Easy Way
- How To Use A Sewing Machine: Step-By-Step Instruction
- How To Thread A Sewing Machine: Step-By-Step Instruction