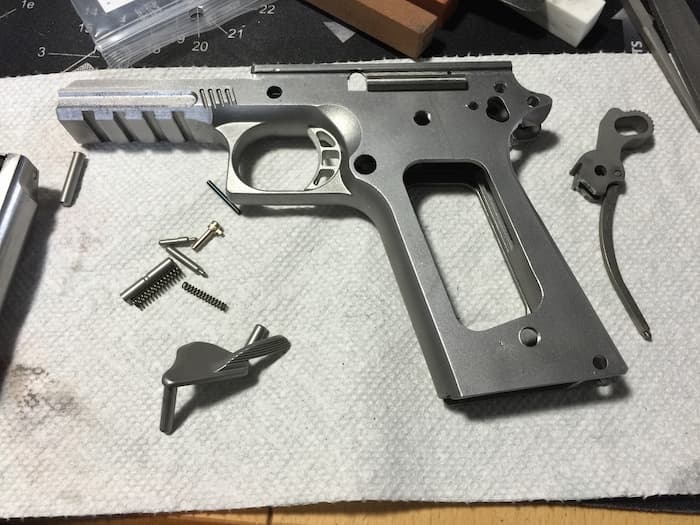
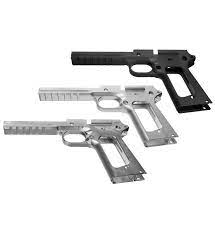
Did you know you can machine your own 1911 frame at home with no paperwork or government red tape? You can. So, how can you make your own 1911 handgun at home? First and foremost: A 1911 80 percent build means you may order your not-yet-a-pistol and have it transported to your home lawfully by ordinary mail, much like an AR15 80 percent lower. The slide rails, hammer and sear pin holes, and barrel seat must all be machined. It may appear to be a lot, but it is actually rather simple.
Preparation for Machining Your 1911 Frame
Step 1: Get the Right Tools to Build Your 1911
Machining your not-a-1911 into a purposeful pistol requires some surprisingly basic, off-the-shelf tooling. All you want to do is reduce the slide rails and barrel seat, drill out the hammer pin gap, and sear the pinhole. For that ability, you will want a hand drill or router, a drill bit, and a ball nostril quit mill cutter.
Step 2: Invest in a 1911 Jig
Picking out a new, brilliant 1911 jig is what excites us most. The 1911 jig will measure and information your slicing and drilling on that 80% 1911 frame, doing the work for you whilst you furnish the muscle on that drill or router. Remember, you are simply slicing the body rails and barrel seat, and drilling two holes. The jig simply does it all for you. Too easy.
Step 3: Buy the components wanted to end your 1911
Believe it or not, machining your 1911 80% body is the hardest part, and it clearly isn’t tough thanks to that 1911 jig. The genuinely exciting phase comes next: selecting all the components you want to collect and certainly personalize your 1911! You’ll want the following stuff to flip that machined 1911 body into a fully-functional pistol:
- Grip, grip bushings, and screws
- Pin set
- Mainspring housing
- Grip safety
- Thumb safety
- Slide stop
- Trigger
- Sear
- Disconnector
- Plunger Tube
- Hammer and strut
- Magazine catch
- Ejector
- Slide
- Barrel, bushing, hyperlink, and pin
- Recoil guide
- Extractor
- Firing pin stop
- Magazine
Machining Your 1911 Frame
With the construct package and jig equipped to go, it is time to begin slicing and drilling our bodies blank. We’ll stroll you via every step with illustrations. Go in advance and Download The Written Instructions, Too.
The steps required to whole your body for the ultimate meeting are simple:
- Cut the slide
- Cut the barrel setting
- Drill the hammer pin hole
- Drill the sear pin hole
Step 1: Assemble the body clean and jig
Parts required:
- RH aspect plate
- LH facet plate
- 0.157 dowel pin
- 0.201 dowel pin
- M5 x .8 Allen-head bolt
Grab your body clean and each jig plate. Orient every plate so the indoor cut-outs on every plate line up with the form of the frame. Each plate is engraved at the barrel end, “LH” and “RH”.
With the body and plates oriented, insert the small dowel pin thru the rear-most gap on the frame’s beavertail. Insert the massive dowel pin thru the top-most gap above the set off guard. Press every plate onto both aspects of the frame.
Secure the body and jig collectively the usage of the furnished Allen-head bolt and key.
Step 2: Drill the hammer and sear pin holes
Parts required:
- #22 drill bit
- #35 drill bit
- Drill press or vertical drill
Lay the body and jig meeting on its side. Your meeting ought to be flawlessly flat and leveled beneath your drill. If not, the holes will no longer permit you to gather your completed body and components kit.
Insert the #22 bit in your drill’s chuck and tighten it. Next, orient the bit so the hammer pin gap on the jig aspect plate is lined up with the bit, pictured below.
WARNING: Do now not strive to drill both pin gaps by means of going via one aspect completely.
The drill bits will flex, and the completed pin holes will no longer be aligned.
Instead, drill every facet of every pin gap by means of solely going halfway via every jig plate. Drill the hammer pin gap with the use of bit #22, then repeat the equal step for the sear pin gap with bit #35.
Step 3: Prep the slicing automobile blade for the slide rail
Parts required:
- Cutting car
- Allen wrench
With your pin holes drilled, half of your machining is already completed! Pretty easy, right? This subsequent step is not difficult, either. Grab the reducing auto and appear underneath. Note the set screw keeping the information boss and slide reducing blade, pictured below.
Grab the splendid Allen wrench and loosen the set screw. This loosens the slicing blade.
Push the unfastened blade up into the information boss, so it is sitting simply barely internal the backside opening.
Re-tighten the set screw.
Step 4: Install the adjustment knob and handle
Parts required:
- Cutting handle
- Adjustment knob
Orient the reducing vehicle so it is top-down with the front dealing with away from you. Insert the manage in the bottom-right gap and thread it in the vicinity till tight.
Next, insert the reducing blade’s adjustment knob in the top-right gap and thread it in place:
The adjustment knob will thread down onto the pinnacle of the information boss till it’s seated. Once threaded on completely, rotating the adjustment knob, in addition, will modify the depth of the slide rail slicing blade underneath.
Step 5: Install the spacer block into the LH aspect plate
Parts required:
- Spacer block
- Bench vise
Before reducing the slide rails, the jig and body clean want to be secured in your vise. This applies strain to the assembly. To hold the integrity of the jig, insert the spacer block into the aspect plate that are you are now not cutting. If you favor complying with the illustrations, insert the spacer block into the LH facet plate as shown:
Next, take hold of your vise and get the workbench equipped for cutting. Be certain to have masses of lubricating oil and make certain your work vicinity is well-lit.
Step 6: Secure your jig in the vise and lubricate
Parts required:
- Bench vise
- Lubricating oil
Orient the body and jig meeting so the LH aspect plate is secured in the jig. Ensure the barrel stop of the body is pointed towards you:
Once secured, practice masses of lubricating oil to the whole floor of the RH facet plate. The slicing auto will be at once contacting (and rubbing against) every website online plate. Oil will make sure the slicing automobile glides freely atop the plates.
Step 7: Set the vehicle atop the jig and “zero out” the blade
Parts required:
- Cutting car
Rest the reducing vehicle atop the RH jig facet plate, however, do not cross it yet. The information boss containing the blade must sit down inner the open slot on the jig’s aspect plate:
We want to “zero” the blade, which ability get the blade simply touching the frame. This will be our beginning position. First, make certain the automobile is resting flat on the jig, as pictured above. If the automobile isn’t always resting flat, the blade is possibly sticking out. Back it off by way of rotating the knob counter-clockwise.
Once the vehicle is flat on the jig, slowly push it away from you. This is the slicing direction. Stop transferring if you experience any friction. This potential the blade is touching the frame. If it is touching, returned the blade off by means of rotating the knob counter-clockwise. Do this till you cannot sense the blade touching the frame. Then, reset the slicing auto by way of bringing it again to the barrel quit of the frame, nearest to you.
Once again, slowly push the vehicle ahead whilst turning the knob clockwise to decrease the blade. Do this till the blade is simply touching and you experience a little friction. Stop transferring when this happens.
You’ve observed your zero.
Step 8: Mark the zero/staring function on the jig
Parts required:
- Bright everlasting marker
Now you want to mark the beginning role on the reducing vehicle with a marker. An instance beginning function is illustrated below, in red. See the notches on the reducing car, under the adjustment knob? There are ten (10) notches in total. Each notch represents 1/10th of a revolution. There is additionally a small white dot on one of the ears of the knob:
You’ll be using this white dot (and the ten notches) to measure the knob’s clockwise rotation and thus, the ever-increasing depth of the cutter.
To entire the cuts for every slide rail, you want to flip the adjustment knob precisely 19 notches from your beginning position, or 1.9 whole rotations.
Step 9: Reduce the slide rails
You’re eventually equipped to cut! With the jig lubed up, the blade zeroed, and the beginning role definitely marked, you can start transferring the reducing vehicle ahead on the frame. This will get rid of aluminum from the frame, carving out every slide rail:
It’s encouraged you whole three to four reducing passes earlier than rotating the knob one notch. We additionally suggest regularly making use of extra lubricating oil for the jig and car. Keep the slide rail location free of aluminum particles by means of the usage of canned air or a brush to smooth the location in between reducing passes.
Tip:
If you note the cutter feeling wobbly or if the knob feels free when turning it, re-tighten the set screw preserving the cutter in place. They can get loose.
To make sure a satisfactory easy finish, make small changes (one-quarter of a notch) for the closing few slicing passes and make sure lots of oil is present.
Repeat steps 6 via 9 for the contrary aspect of the frame.
Once you’ve got performed the slide rails on each facet of the frame, you can cross the body and jig from the vise.
Take a break, come back, and get prepared for the machining remaining step: Cutting the barrel seat.
Step 10: Prepare your work to reduce the barrel seat
First, disassemble the body from the jig with the aid of putting off the M5 x .8 Allen-head screw and dowel pins. Take a second to look at the frame, and smooth off any debris.
Re-secure the body and jig with the aid of relocating the dowel pins and re-tightening the screw as proven below:
With the body and jig reassembled, clamp the meeting vertically in your bench vise. To stop marring the surfaces of the face plates for future builds, use some rags or towels between the vise jaws.
Next, seize the reducing auto and relocate the take care of and adjustment knob to the left facet of the car:
Step 11: Zero the barrel seat blade, reduce the seat
To commence slicing the barrel seat, function the auto atop the body and jig as proven below. Apply masses of lubricating oil to all the contacted surfaces simply like before:
BEFORE CUTTING, be positive to loosen the barrel seat slicing blade’s set screw and zero the blade. Repeat steps 7 and eight as described above.
Remember to mark the beginning role of the blade relative to the white dot on the adjustment knob earlier than making the first cut.
The barrel seat needs to be reduced to a depth of 0.077″, which requires 2.4 whole revolutions (24 notches) of the adjustment knob. Just as before, make smaller cuts for the last passes to reap a smooth, polished finish.
Barrel Seat Cutting Tip
To make certain you do not reduce the barrel seat too much, double-check the slicing blade’s depth as you close to the end. There are two ears on both facets of the cutter:
If you see the ears on both aspects of the cutter getting rid of cloth from the frame, STOP CUTTING. You’ve reached your last slicing depth.
Your 1911 Frame is Complete
With the barrel seat cut, you can take a second to celebrate. You’re now the proprietor of an acceptable 1911 frame! With the whole lot reduce and drilled, you can commence the closing meeting of your slide, barrel, and components kit.
Step 12: Final Assembly
With your body finished, it can be assembled with suitable 1911 components of your choice. These frames work with all retail 1911 components chambered in 9mm and .45 ACP, with slides, barrels, and components configured for Government and Commander frames.
Summary
The most difficult element of this project is cutting and drilling the 80 percent 1911 frame. But, with the correct equipment and careful attention to detail, you can have your own home-built 1911 ready for the range in a single day.
DISCLAIMER: If you’re new to the field of DIY gun making, you probably have a lot of questions. It’s an area with a lot of issues that, if not answered correctly, might have catastrophic consequences. We at 80-lower.com do not intend for this material on our website to be used as legal advice or guidance. We advise all builders to conduct their own study on their particular state regulations as well as educate themselves on federal legislation. Please ensure that you are receiving your information from a credible source while conducting your own research.