Read this guide to learn how to thread a sewing machine. The most fundamental beginning step is appropriately threading your sewing machine. So dust off your machine, pull yourself up and get ready to start sewing again. Add some innovative suggestions to make the process smoother, and your relationship with your sewing machine may be transformed.

How To Thread A Sewing Machine
Threading your sewing machine is the process of loading an upper and lower thread into your machine. In order to generate stitches in your material, the machine will weave these two threads together. When it comes to threading, each sewing machine is slightly different, but there are a few common processes that most machines follow. When threading your sewing machine for the first time, consult your instruction booklet.
Preparations of threading a Sewing Machine
- Check your sewing handbook first, if you have one. It should provide diagrammatic instructions for threading your specific machine. If you’ve misplaced your handbook, browse this page for links to online sewing machine manuals.
- Fill the bobbin with the color thread you intend to use. (Learn how to wind a bobbin here.)
- Always use high-quality threads like Rasant, Gutterman, or Coates. Your thread should be appropriate for your cloth selections. (Learn more about sewing thread kinds.)
How To Thread A Sewing Machine In 3 Parts
Part 1: Winding the Bobbin
- Place your thread spool on the spool pin. Place your spool of thread on the pinnacle of the stitching machine, on the spool pin. The spool must become so that the thread will be launched counter-clockwise.
- Check the pinnacle of your laptop for a design earlier than you area your thread spool. Some machines have a small graph on the pinnacle that suggests the place the thread spool must go.
- Pull the thread out. Tug at the thread to pull it out, and wind it around the bobbin winding anxiety disc at the pinnacle of the stitching machine. This section is on the contrary facet of the stitching machine, above the needle. The disc may also additionally have a small wire connected to it that will assist to preserve the thread in place.
- Thread the bobbin. Next, take the give up of the thread and insert it thru one of the holes in your bobbin. Then, wrap the thread around the bobbin a few instances to tightly closed it.
- Keep in thinking that there are additionally pre-threaded bobbins reachable in craft shops if you do now not want to thread your personal bobbins.
- Put the bobbin on the bobbin pin. The bobbin pin is a small pin that is in all likelihood on the pinnacle of your computing device close to the place the spool pin is located. Place the bobbin on this pin. Then, slide the pin over to the proper to lock the bobbin in location for winding.
- You must hear the bobbin pin click on into the region when you slide it over.
- Start the bobbin winder. Start winding the bobbin for a few seconds via pushing down on the foot pedal or by using urgent the bobbin winding button (if your computer has one). Doing this will make sure that the thread is securely wrapped around the bobbin. After a few rotations, you can cease for a second to reduce the extra thread that is sticking out of the gap in the bobbin.
- Finish winding the bobbin. Apply mild strain to the flooring pedal once more or flip the winder returned on and enable it to definitely fill the bobbin with thread. Your winder can also give up on its very own when the bobbin is full, however, if it doesn’t then quit it when the thread is nearly even with the part of the bobbin spool.
- Remove the bobbin. Slide the bobbin pin over to the left and put off the bobbin. The thread will nevertheless be connected to the thread spool as nicely as the bobbin, so reduce the extra with a pair of scissors, leaving a 2–3 inch (5.1–7.6 cm) tail.
- When your bobbin is full, you will be equipped to begin threading your machine.
Part 2: Threading the Upper Half of the Machine
- Place the thread spool onto the spool pin. The spool pin is placed on the proper aspect of the machine. It is large of the two pins on this side. Place your thread onto the spool pin and pull a bit of thread away from it.
- The spool may also be greater secure if you locate it so that the thread is coming from underneath the spool when you seem down at it.
- If your computer has a diagram, then you can take a look at it to see the place the spool pin is positioned and which route the thread needs to be going.
- Wrap the thread around the thread guide. Pull the top of the thread out from the spool on the pinnacle of the stitching machine. Bring the thread throughout the pinnacle of the desktop and thru the thread information on the pinnacle of the machine. This will seem like a silver piece that is sticking out from the top.
- Make certain to deliver the thread around the lower back aspect of the information and toward the front the place the “U” formed a place for your thread to go thru subsequent is located.
- There will probably be printed hints on the pinnacle of the laptop diagramming how to work the thread thru this area.
- Pull the thread down. Follow the directional arrows on your stitching desktop by means of pulling the thread via the information and in your direction of you. You will be looping it around the anxiety discs on the bottom, and then again up closer to the pinnacle alongside and via the 2nd thread guide. This will finally create a long, slender “U” structure with your thread.
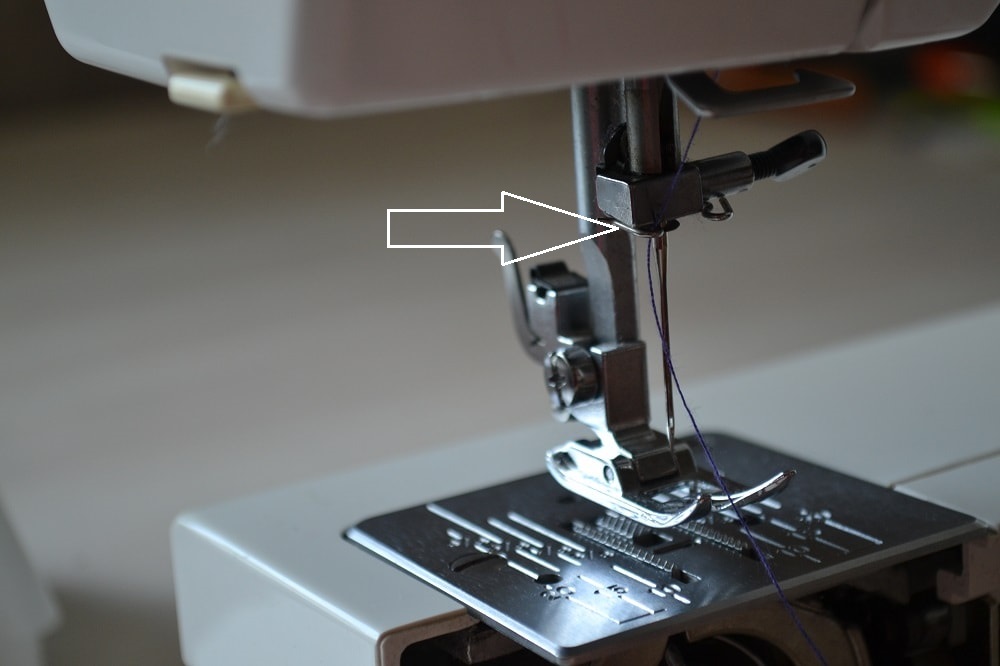
- Wrap the thread around the takeup lever. After you’ve accomplished the “U” shape, you will want to wind the thread round the takeup lever at the pinnacle and then return down closer to the needle. The take-up lever is a steel piece sticking out of the 2d thread guide. This metallic piece will have a gap reduced out close to the pinnacle that the thread wants to go through. Completing this movement will create a large, narrow, sideways “S” with the thread.
- Thread the needle. Pull the thread lower back down the desktop in the direction of the needle. Thread the needle via the small eye in the needle and pull numerous inches of thread out the different sides. Then, pull this thread via a hole in the small steel presser foot at once under it.
- The higher 1/2 of your laptop is now threaded and you simply want to thread the decrease 1/2 earlier than you can use the machine.
Part 3: Threading the Lower Half of the Machine
- Remove the protection on the decreased compartment. The bobbin’s case is beneath a small door that is both immediately under or to the facet in the front of your needle. Find this chamber and open it. This will expose the bobbin case, which is the place you will want to vicinity your threaded bobbin.
- The compartment cowl has to come off easily. If it does not, then take a look it to make certain that this is honestly the compartment.
- In some machines, the bobbin case will additionally have a small cover. Make certain to put off this as nicely as to divulge the slot for your bobbin.
- Unwind a few inches of thread from the bobbin. Before setting the bobbin into its compartment, pull the top of the thread to unwind a few inches of thread from the bobbin. This will be adequate to trap when you flip the handwheel.
- Make certain that you unwind sufficient thread to catch. A few inches is generally plenty, however, unwind too little thread and the thread can also no longer catch.
- Place the bobbin in the compartment under the needle. Check the plan on the bobbin compartment to see what course your thread must be going. Place the bobbin into the compartment with the thread going in the course indicated by way of the diagram.
- You must be capable to pull on the tail of the thread to the proper and the thread has to unwind pretty easily.
- Close the compartment when the bobbin is in place. Make positive to change the bobbin case cowl (if your computer has one) as well.
- Expose the bobbin thread. The bobbin thread is nevertheless hiding below the plate under the needle. To carry out the cease of it, draw close the spherical dial/wheel on the proper aspect of your sewing machine. Turn it closer to you a few times, and the give-up of the thread ought to pop out. Grab it and pull so that a few inches of the thread are exposed.
- If the thread does now not catch, then test the compartment to see if the thread is going in the proper course and make positive that the thread strikes effortlessly when you pull on it. If it does not, then it would possibly be too full and you can also want to unwind some of the thread.
Tips for Threading A Sewing Machine
Once you’ve mastered the fundamentals of threading, the only remaining hurdle is needle threading. What could be simpler than threading a piece of cotton through the eye of a needle?
In general, a simple task, but the sewing machine needle cannot be held up to the light, closer to your point of vision, or further, if you are nearing the end of your reading glasses period of life! Your little needle with an eye is attached to your machine and inserted into a socket. It is the final stage in the threading of a sewing machine.
- If you do require glasses, have an extra pair that are somewhat stronger just for threading the needle. It will aid in magnifying the needle’s eye.
- With very sharp scissors, trim the thread end.
- You might moisten the end of the thread with a modest lick of your lips or a wet fingertip. Threading is easier with damp thread.
- Additional lighting on the topic is also an option. The gadget has a light, but a study lamp might help to illuminate the topic.
- There are additional needle threading aids available for purchase.
Learn More
Finally, have fun. Now that you know how to thread your sewing machine, the world is your oyster. Think of all the sewing projects you can sew and have fun with!
If you want to improve your fashion design skills, please click on our other posts.
Have you ever been stuck in the following problems with sewing machines? Read & Learn more together!
- Why My Sewing Machine Not Making Straight Stitches – How to Adjust
- Why My Sewing Machine Skipping Stitches – How to Fix
- How to Change Sewing Machine Needle With Simple Methods
- How To Clean Your Sewing Machine With Simple Steps
- Why Does My Sewing Machine Keep Jamming – How To Solve
- What is a Serger Sewing Machine – Everything You Should Know
- How To Hem Pants By Sewing Machine In The Easy Way
- How to Use Brother Sewing Machine – Beginner Guide 2022
- How To Use A Sewing Machine: Step-By-Step Instruction